先觉条件
装备需要一台Windows电脑
需要一台安装好Cobbler 的服务器
测试虚拟机2台以上。
软件准备
官方Windows ADK
系统下载
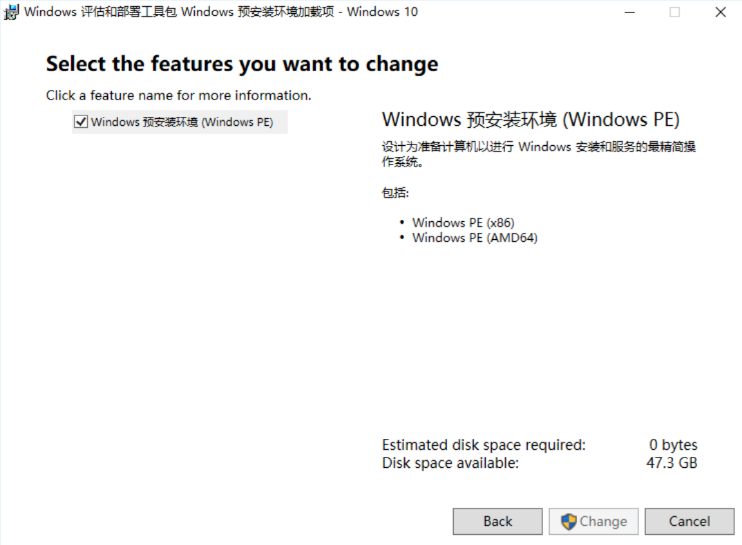
注意!adk的两个都要下载,这俩都是引导包,真正的安装程序会由这俩软件进行下载。
安装ADK
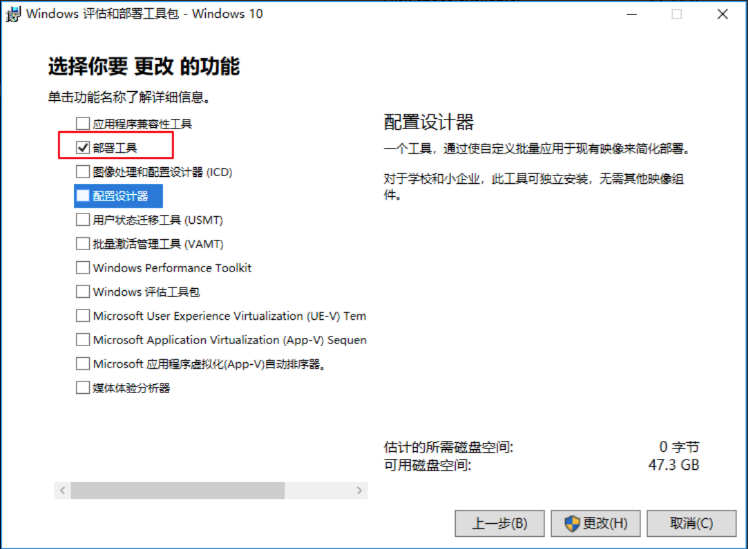
安装WinPE
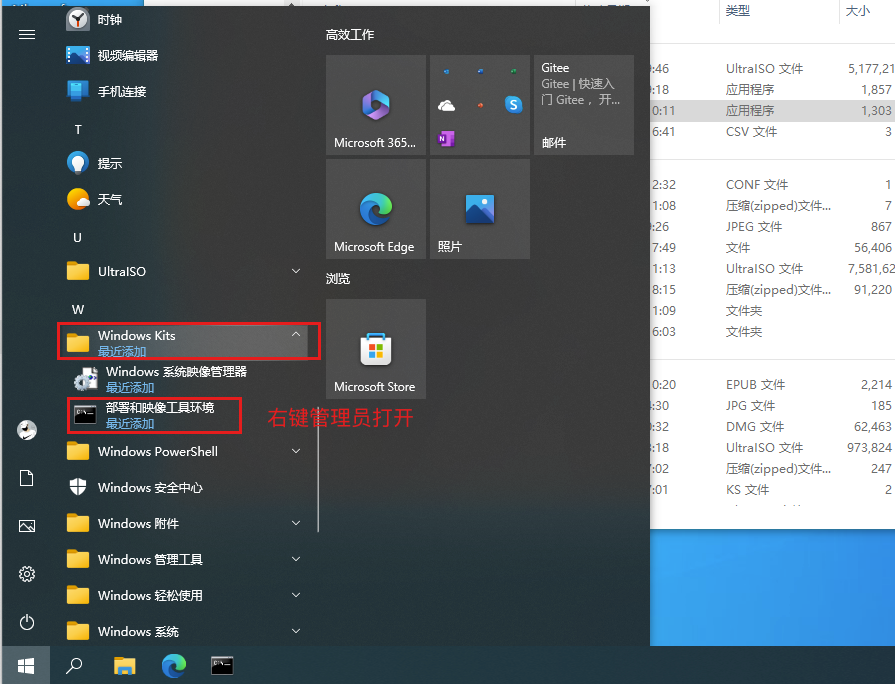
安装完后,以管理员身份打开部署和映像工具环境
定制Win 10 PE
在部署和映像工具环境里面操作以下内容。
MakeWinPEMedia /ISO C:\
winpeC:\winpe\winpe_win10_amd64.iso 这是文件生成的目录。
# 本地生成winpe文件目录
copype amd64 C:\winpe
# dism 挂载 winpe的启动文件到winpe的mount目录
Dism /mount-image /imagefile:C:\winpe\media\sources\boot.wim /index:1 /mountdir:C:\winpe\mount
# 将启动命令硬编码写死到winpe的startnet.cmd文件里
echo net use z: \\服务器ip地址\share >> C:\winpe\mount\Windows\System32\startnet.cmd
# 无人值守安装
echo z:\win\setup.exe /unattend:z:\win\win10_x64_bios_auto.xml >> C:\winpe\mount\Windows\System32\startnet.cmd
# 卸载winpe的挂载(一定要执行,否则直接强制删除文件夹会出一些稀奇古怪的问题)
Dism /unmount-image /mountdir:C:\winpe\mount /commit
# 制作win10镜像,名为 winpe_win10_amd64.iso
MakeWinPEMedia /ISO C:\winpe C:\winpe\winpe_win10_amd64.iso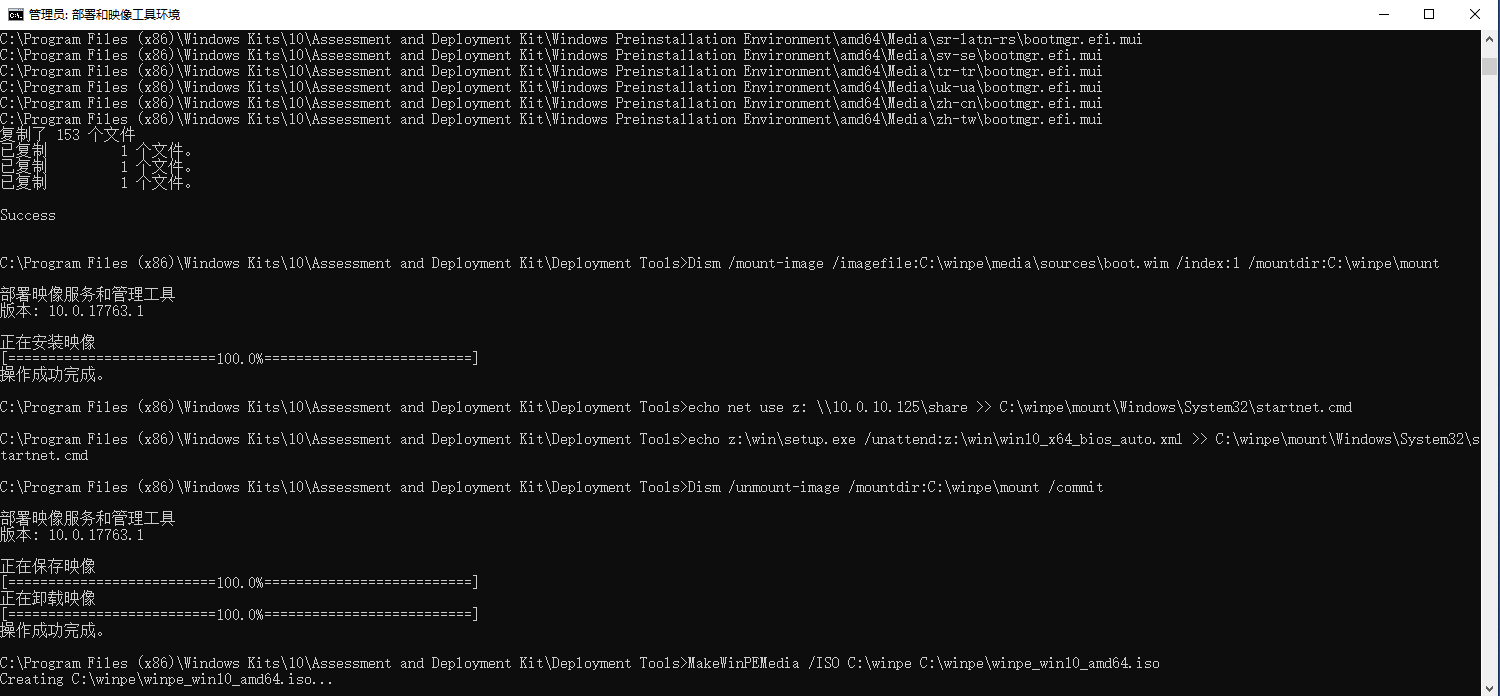

配置Cobbler Server
导入Cobbler
winpe_win10_amd64.iso这个文件是第一次在windows里面操作的步骤。
使用WinScp 等工具,将 winpe_win10_amd64.iso 上传到 Cobbler 服务器上
# 在 Cobbler 配置管理工具中添加一个名为 "windows_10_x64" 的发行版。它使用了指定的内核文件路径 (--kernel=/var/lib/tftpboot/memdisk) 和初始化 RAM 镜像文件路径 (--initrd=/root/winpe_win10_amd64.iso)。--kopts="raw iso" 参数指定了内核选项,这里的意思是将 winpe_win10_amd64.iso 文件作为原始(raw)ISO 映像来加载。

cobbler distro add --name=windows_10_x64 --kernel=/var/lib/tftpboot/memdisk --initrd=/root/winpe_win10_amd64.iso --kopts="raw iso"

# 创建一个xml的空文件

touch /var/lib/cobbler/kickstarts/winpe.xml

#在 Cobbler 配置管理工具中添加一个名为 "windows_10_x64" 的配置文件(profile)。它使用了名为 "windows_10_x64" 的发行版(distro)作为基础。--kickstart=/var/lib/cobbler/kickstarts/winpe.xml 参数指定了 Kickstart 文件的路径,该文件用于自动化安装过程中的配置和操作。在这种情况下,使用了名为 "winpe.xml" 的 Kickstart 文件。

cobbler profile add --name=windows_10_x64 --distro=windows_10_x64 --kickstart=/var/lib/cobbler/kickstarts/winpe.xml
创建自动应答文件
直接从 Windows Answer File Generator#win10_x86_64 通过简单配置,下载即可。(只支持简单操作,比如,装系统,格式化磁盘,设置密码等)
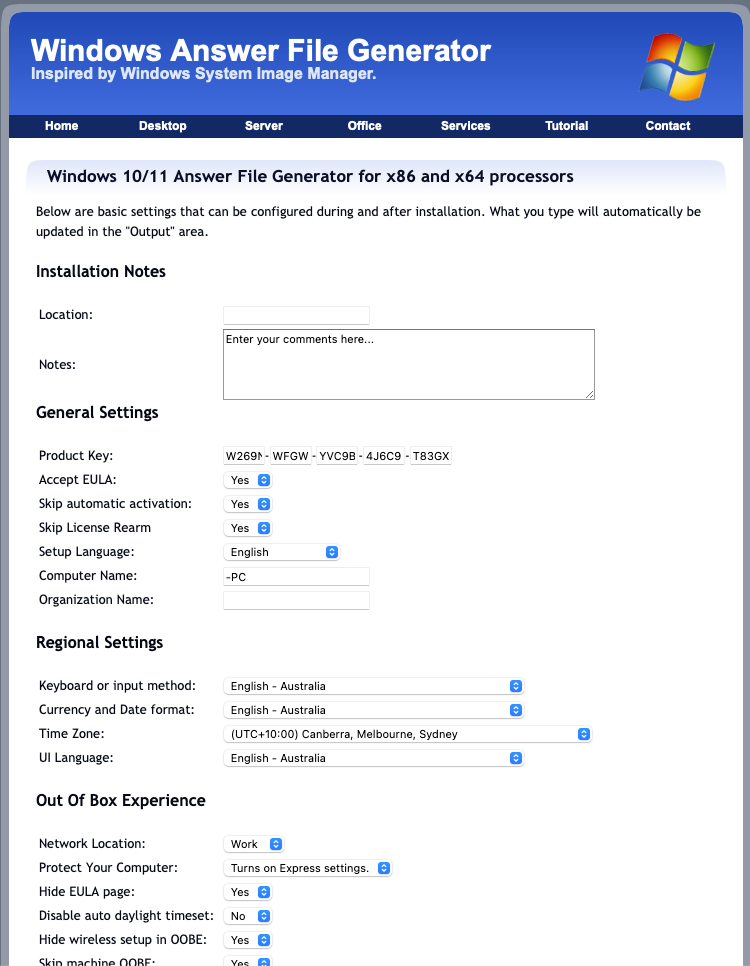
【Windows系统映像管理器】,具体用法可以参考 How to create an unattended installation of Windows 10。也可以通过MDT简化操作。
手动创建自动应答文件
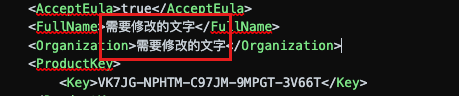
安装密钥,统一替换为 VK7JG-NPHTM-C97JM-9MPGT-3V66T
需要修改的标签
FullName、ComputerName、Username、Description、DisplayName、Name、RegisteredOrganization、CommandLine、RegisteredOwner 标签里面包含了计算机名称以及用户名称,显示名称等等。
需要修改的地方我已经在标签里面做了提示,请找到替换成自己的场景。
创建的应答文件,上传到cobbler
/smb/win/win10_x64_bios_auto.xml
<?xml version="1.0" encoding="utf-8"?>
<unattend
xmlns="urn:schemas-microsoft-com:unattend">
<settings pass="windowsPE">
<component name="Microsoft-Windows-International-Core-WinPE" processorArchitecture="x86" publicKeyToken="31bf3856ad364e35" language="neutral" versionScope="nonSxS"
xmlns:wcm="http://schemas.microsoft.com/WMIConfig/2002/State"
xmlns:xsi="http://www.w3.org/2001/XMLSchema-instance">
<SetupUILanguage>
<UILanguage>en-US</UILanguage>
</SetupUILanguage>
<InputLocale>0804:{81D4E9C9-1D3B-41BC-9E6C-4B40BF79E35E}{FA550B04-5AD7-411f-A5AC-CA038EC515D7}</InputLocale>
<SystemLocale>zh-CN</SystemLocale>
<UILanguage>zh-CN</UILanguage>
<UILanguageFallback>zh-CN</UILanguageFallback>
<UserLocale>zh-CN</UserLocale>
</component>
<component name="Microsoft-Windows-International-Core-WinPE" processorArchitecture="amd64" publicKeyToken="31bf3856ad364e35" language="neutral" versionScope="nonSxS"
xmlns:wcm="http://schemas.microsoft.com/WMIConfig/2002/State"
xmlns:xsi="http://www.w3.org/2001/XMLSchema-instance">
<SetupUILanguage>
<UILanguage>en-US</UILanguage>
</SetupUILanguage>
<InputLocale>0804:{81D4E9C9-1D3B-41BC-9E6C-4B40BF79E35E}{FA550B04-5AD7-411f-A5AC-CA038EC515D7}</InputLocale>
<SystemLocale>zh-CN</SystemLocale>
<UILanguage>zh-CN</UILanguage>
<UILanguageFallback>zh-CN</UILanguageFallback>
<UserLocale>zh-CN</UserLocale>
</component>
<component name="Microsoft-Windows-Setup" processorArchitecture="x86" publicKeyToken="31bf3856ad364e35" language="neutral" versionScope="nonSxS"
xmlns:wcm="http://schemas.microsoft.com/WMIConfig/2002/State"
xmlns:xsi="http://www.w3.org/2001/XMLSchema-instance">
<DiskConfiguration>
<Disk wcm:action="add">
<CreatePartitions>
<CreatePartition wcm:action="add">
<Order>1</Order>
<Type>Primary</Type>
<Size>100</Size>
</CreatePartition>
<CreatePartition wcm:action="add">
<Extend>true</Extend>
<Order>2</Order>
<Type>Primary</Type>
</CreatePartition>
</CreatePartitions>
<ModifyPartitions>
<ModifyPartition wcm:action="add">
<Active>true</Active>
<Format>NTFS</Format>
<Label>System Reserved</Label>
<Order>1</Order>
<PartitionID>1</PartitionID>
<TypeID>0x27</TypeID>
</ModifyPartition>
<ModifyPartition wcm:action="add">
<Active>true</Active>
<Format>NTFS</Format>
<Label>OS</Label>
<Letter>C</Letter>
<Order>2</Order>
<PartitionID>2</PartitionID>
</ModifyPartition>
</ModifyPartitions>
<DiskID>0</DiskID>
<WillWipeDisk>true</WillWipeDisk>
</Disk>
</DiskConfiguration>
<ImageInstall>
<OSImage>
<InstallTo>
<DiskID>0</DiskID>
<PartitionID>2</PartitionID>
</InstallTo>
<InstallToAvailablePartition>false</InstallToAvailablePartition>
</OSImage>
</ImageInstall>
<UserData>
<AcceptEula>true</AcceptEula>
<FullName>需要修改的文字</FullName>
<Organization>需要修改的文字</Organization>
<ProductKey>
<Key>VK7JG-NPHTM-C97JM-9MPGT-3V66T</Key>
</ProductKey>
</UserData>
</component>
<component name="Microsoft-Windows-Setup" processorArchitecture="amd64" publicKeyToken="31bf3856ad364e35" language="neutral" versionScope="nonSxS"
xmlns:wcm="http://schemas.microsoft.com/WMIConfig/2002/State"
xmlns:xsi="http://www.w3.org/2001/XMLSchema-instance">
<DiskConfiguration>
<Disk wcm:action="add">
<CreatePartitions>
<CreatePartition wcm:action="add">
<Order>1</Order>
<Type>Primary</Type>
<Size>100</Size>
</CreatePartition>
<CreatePartition wcm:action="add">
<Extend>true</Extend>
<Order>2</Order>
<Type>Primary</Type>
</CreatePartition>
</CreatePartitions>
<ModifyPartitions>
<ModifyPartition wcm:action="add">
<Active>true</Active>
<Format>NTFS</Format>
<Label>System Reserved</Label>
<Order>1</Order>
<PartitionID>1</PartitionID>
<TypeID>0x27</TypeID>
</ModifyPartition>
<ModifyPartition wcm:action="add">
<Active>true</Active>
<Format>NTFS</Format>
<Label>OS</Label>
<Letter>C</Letter>
<Order>2</Order>
<PartitionID>2</PartitionID>
</ModifyPartition>
</ModifyPartitions>
<DiskID>0</DiskID>
<WillWipeDisk>true</WillWipeDisk>
</Disk>
</DiskConfiguration>
<ImageInstall>
<OSImage>
<InstallTo>
<DiskID>0</DiskID>
<PartitionID>2</PartitionID>
</InstallTo>
<InstallToAvailablePartition>false</InstallToAvailablePartition>
</OSImage>
</ImageInstall>
<UserData>
<AcceptEula>true</AcceptEula>
<FullName>需要修改的文字</FullName>
<Organization>需要修改的文字</Organization>
<ProductKey>
<Key>VK7JG-NPHTM-C97JM-9MPGT-3V66T</Key>
</ProductKey>
</UserData>
</component>
</settings>
<settings pass="offlineServicing">
<component name="Microsoft-Windows-LUA-Settings" processorArchitecture="x86" publicKeyToken="31bf3856ad364e35" language="neutral" versionScope="nonSxS"
xmlns:wcm="http://schemas.microsoft.com/WMIConfig/2002/State"
xmlns:xsi="http://www.w3.org/2001/XMLSchema-instance">
<EnableLUA>false</EnableLUA>
</component>
</settings>
<settings pass="offlineServicing">
<component name="Microsoft-Windows-LUA-Settings" processorArchitecture="amd64" publicKeyToken="31bf3856ad364e35" language="neutral" versionScope="nonSxS"
xmlns:wcm="http://schemas.microsoft.com/WMIConfig/2002/State"
xmlns:xsi="http://www.w3.org/2001/XMLSchema-instance">
<EnableLUA>false</EnableLUA>
</component>
</settings>
<settings pass="generalize">
<component name="Microsoft-Windows-Security-SPP" processorArchitecture="x86" publicKeyToken="31bf3856ad364e35" language="neutral" versionScope="nonSxS"
xmlns:wcm="http://schemas.microsoft.com/WMIConfig/2002/State"
xmlns:xsi="http://www.w3.org/2001/XMLSchema-instance">
<SkipRearm>1</SkipRearm>
</component>
</settings>
<settings pass="generalize">
<component name="Microsoft-Windows-Security-SPP" processorArchitecture="amd64" publicKeyToken="31bf3856ad364e35" language="neutral" versionScope="nonSxS"
xmlns:wcm="http://schemas.microsoft.com/WMIConfig/2002/State"
xmlns:xsi="http://www.w3.org/2001/XMLSchema-instance">
<SkipRearm>1</SkipRearm>
</component>
</settings>
<settings pass="specialize">
<component name="Microsoft-Windows-International-Core" processorArchitecture="x86" publicKeyToken="31bf3856ad364e35" language="neutral" versionScope="nonSxS"
xmlns:wcm="http://schemas.microsoft.com/WMIConfig/2002/State"
xmlns:xsi="http://www.w3.org/2001/XMLSchema-instance">
<InputLocale>0804:{81D4E9C9-1D3B-41BC-9E6C-4B40BF79E35E}{FA550B04-5AD7-411f-A5AC-CA038EC515D7}</InputLocale>
<SystemLocale>zh-CN</SystemLocale>
<UILanguage>zh-CN</UILanguage>
<UILanguageFallback>zh-CN</UILanguageFallback>
<UserLocale>zh-CN</UserLocale>
</component>
<component name="Microsoft-Windows-International-Core" processorArchitecture="amd64" publicKeyToken="31bf3856ad364e35" language="neutral" versionScope="nonSxS"
xmlns:wcm="http://schemas.microsoft.com/WMIConfig/2002/State"
xmlns:xsi="http://www.w3.org/2001/XMLSchema-instance">
<InputLocale>0804:{81D4E9C9-1D3B-41BC-9E6C-4B40BF79E35E}{FA550B04-5AD7-411f-A5AC-CA038EC515D7}</InputLocale>
<SystemLocale>zh-CN</SystemLocale>
<UILanguage>zh-CN</UILanguage>
<UILanguageFallback>zh-CN</UILanguageFallback>
<UserLocale>zh-CN</UserLocale>
</component>
<component name="Microsoft-Windows-Security-SPP-UX" processorArchitecture="x86" publicKeyToken="31bf3856ad364e35" language="neutral" versionScope="nonSxS"
xmlns:wcm="http://schemas.microsoft.com/WMIConfig/2002/State"
xmlns:xsi="http://www.w3.org/2001/XMLSchema-instance">
<SkipAutoActivation>true</SkipAutoActivation>
</component>
<component name="Microsoft-Windows-Security-SPP-UX" processorArchitecture="amd64" publicKeyToken="31bf3856ad364e35" language="neutral" versionScope="nonSxS"
xmlns:wcm="http://schemas.microsoft.com/WMIConfig/2002/State"
xmlns:xsi="http://www.w3.org/2001/XMLSchema-instance">
<SkipAutoActivation>true</SkipAutoActivation>
</component>
<component name="Microsoft-Windows-SQMApi" processorArchitecture="x86" publicKeyToken="31bf3856ad364e35" language="neutral" versionScope="nonSxS"
xmlns:wcm="http://schemas.microsoft.com/WMIConfig/2002/State"
xmlns:xsi="http://www.w3.org/2001/XMLSchema-instance">
<CEIPEnabled>0</CEIPEnabled>
</component>
<component name="Microsoft-Windows-SQMApi" processorArchitecture="amd64" publicKeyToken="31bf3856ad364e35" language="neutral" versionScope="nonSxS"
xmlns:wcm="http://schemas.microsoft.com/WMIConfig/2002/State"
xmlns:xsi="http://www.w3.org/2001/XMLSchema-instance">
<CEIPEnabled>0</CEIPEnabled>
</component>
<component name="Microsoft-Windows-Shell-Setup" processorArchitecture="x86" publicKeyToken="31bf3856ad364e35" language="neutral" versionScope="nonSxS"
xmlns:wcm="http://schemas.microsoft.com/WMIConfig/2002/State"
xmlns:xsi="http://www.w3.org/2001/XMLSchema-instance">
<ComputerName>需要修改的文字-PC</ComputerName>
<ProductKey>VK7JG-NPHTM-C97JM-9MPGT-3V66T</ProductKey>
</component>
<component name="Microsoft-Windows-Shell-Setup" processorArchitecture="amd64" publicKeyToken="31bf3856ad364e35" language="neutral" versionScope="nonSxS"
xmlns:wcm="http://schemas.microsoft.com/WMIConfig/2002/State"
xmlns:xsi="http://www.w3.org/2001/XMLSchema-instance">
<ComputerName>需要修改的文字-PC</ComputerName>
<ProductKey>VK7JG-NPHTM-C97JM-9MPGT-3V66T</ProductKey>
</component>
</settings>
<settings pass="oobeSystem">
<component name="Microsoft-Windows-Shell-Setup" processorArchitecture="x86" publicKeyToken="31bf3856ad364e35" language="neutral" versionScope="nonSxS"
xmlns:wcm="http://schemas.microsoft.com/WMIConfig/2002/State"
xmlns:xsi="http://www.w3.org/2001/XMLSchema-instance">
<AutoLogon>
<Password>
<Value></Value>
<PlainText>true</PlainText>
</Password>
<Enabled>true</Enabled>
<Username>需要修改的文字</Username>
</AutoLogon>
<OOBE>
<HideEULAPage>true</HideEULAPage>
<HideOEMRegistrationScreen>true</HideOEMRegistrationScreen>
<HideOnlineAccountScreens>true</HideOnlineAccountScreens>
<HideWirelessSetupInOOBE>true</HideWirelessSetupInOOBE>
<NetworkLocation>Work</NetworkLocation>
<SkipUserOOBE>true</SkipUserOOBE>
<SkipMachineOOBE>true</SkipMachineOOBE>
<ProtectYourPC>1</ProtectYourPC>
</OOBE>
<UserAccounts>
<LocalAccounts>
<LocalAccount wcm:action="add">
<Password>
<Value></Value>
<PlainText>true</PlainText>
</Password>
<Description>需要修改的文字</Description>
<DisplayName>需要修改的文字</DisplayName>
<Group>Administrators</Group>
<Name>需要修改的文字</Name>
</LocalAccount>
</LocalAccounts>
</UserAccounts>
<RegisteredOrganization>需要修改的文字</RegisteredOrganization>
<RegisteredOwner>需要修改的文字</RegisteredOwner>
<DisableAutoDaylightTimeSet>false</DisableAutoDaylightTimeSet>
<FirstLogonCommands>
<SynchronousCommand wcm:action="add">
<Description>Control Panel View</Description>
<Order>1</Order>
<CommandLine>reg add "HKEY_CURRENT_USER\Software\Microsoft\Windows\CurrentVersion\Explorer\ControlPanel" /v StartupPage /t REG_DWORD /d 1 /f</CommandLine>
<RequiresUserInput>true</RequiresUserInput>
</SynchronousCommand>
<SynchronousCommand wcm:action="add">
<Order>2</Order>
<Description>Control Panel Icon Size</Description>
<RequiresUserInput>false</RequiresUserInput>
<CommandLine>reg add "HKEY_CURRENT_USER\Software\Microsoft\Windows\CurrentVersion\Explorer\ControlPanel" /v AllItemsIconView /t REG_DWORD /d 0 /f</CommandLine>
</SynchronousCommand>
<SynchronousCommand wcm:action="add">
<Order>3</Order>
<RequiresUserInput>false</RequiresUserInput>
<CommandLine>cmd /C wmic useraccount where name="需要修改的文字" set PasswordExpires=false</CommandLine>
<Description>Password Never Expires</Description>
</SynchronousCommand>
</FirstLogonCommands>
<TimeZone>China Standard Time</TimeZone>
</component>
<component name="Microsoft-Windows-Shell-Setup" processorArchitecture="amd64" publicKeyToken="31bf3856ad364e35" language="neutral" versionScope="nonSxS"
xmlns:wcm="http://schemas.microsoft.com/WMIConfig/2002/State"
xmlns:xsi="http://www.w3.org/2001/XMLSchema-instance">
<AutoLogon>
<Password>
<Value></Value>
<PlainText>true</PlainText>
</Password>
<Enabled>true</Enabled>
<Username>需要修改的文字</Username>
</AutoLogon>
<OOBE>
<HideEULAPage>true</HideEULAPage>
<HideOEMRegistrationScreen>true</HideOEMRegistrationScreen>
<HideOnlineAccountScreens>true</HideOnlineAccountScreens>
<HideWirelessSetupInOOBE>true</HideWirelessSetupInOOBE>
<NetworkLocation>Work</NetworkLocation>
<SkipUserOOBE>true</SkipUserOOBE>
<SkipMachineOOBE>true</SkipMachineOOBE>
<ProtectYourPC>1</ProtectYourPC>
</OOBE>
<UserAccounts>
<LocalAccounts>
<LocalAccount wcm:action="add">
<Password>
<Value></Value>
<PlainText>true</PlainText>
</Password>
<Description>需要修改的文字</Description>
<DisplayName>需要修改的文字</DisplayName>
<Group>Administrators</Group>
<Name>需要修改的文字</Name>
</LocalAccount>
</LocalAccounts>
</UserAccounts>
<RegisteredOrganization>需要修改的文字</RegisteredOrganization>
<RegisteredOwner>需要修改的文字</RegisteredOwner>
<DisableAutoDaylightTimeSet>false</DisableAutoDaylightTimeSet>
<FirstLogonCommands>
<SynchronousCommand wcm:action="add">
<Description>Control Panel View</Description>
<Order>1</Order>
<CommandLine>reg add "HKEY_CURRENT_USER\Software\Microsoft\Windows\CurrentVersion\Explorer\ControlPanel" /v StartupPage /t REG_DWORD /d 1 /f</CommandLine>
<RequiresUserInput>true</RequiresUserInput>
</SynchronousCommand>
<SynchronousCommand wcm:action="add">
<Order>2</Order>
<Description>Control Panel Icon Size</Description>
<RequiresUserInput>false</RequiresUserInput>
<CommandLine>reg add "HKEY_CURRENT_USER\Software\Microsoft\Windows\CurrentVersion\Explorer\ControlPanel" /v AllItemsIconView /t REG_DWORD /d 0 /f</CommandLine>
</SynchronousCommand>
<SynchronousCommand wcm:action="add">
<Order>3</Order>
<RequiresUserInput>false</RequiresUserInput>
<CommandLine>cmd /C wmic useraccount where name="需要修改的文字" set PasswordExpires=false</CommandLine>
<Description>Password Never Expires</Description>
</SynchronousCommand>
</FirstLogonCommands>
<TimeZone>China Standard Time</TimeZone>
</component>
</settings>
</unattend>配置Samba
安装Samba
yum install samba -y配置samba共享服务器
默认配置文件请做备份 cp /etc/samba/smb.conf /etc/samba/smb.conf.bak
默认文件里面的东西有很多,可以修改,建议直接删除,替换。
vi /etc/samba/smb.conf编辑配置文件,把以下内容替换进去path =
/smb/这里面存放的是 Windows 10 的完整镜像。
[global]
log file = /var/log/samba/log.%m
max log size = 5000
security = user
guest account = nobody
map to guest = Bad User
load printers = yes
cups options = raw

[share]
comment = share directory目录
path = /smb/
directory mask = 0755
create mask = 0755
guest ok=yes
writable=yes
启动smb服务
service smb start
systemctl enable smb
挂载Win10系统
上传系统到服务器
通过winscp SFTP 把镜像上传到服务器
home目录。创建的应答文件,上传到cobbler
/smb/win/win10_x64_bios_auto.xml把挂载的系统镜像文件拷贝到
/smb/win
cd /tmp/
mkdir -p win10
mount -o loop,ro /home/cn_windows_10_business_editions_version_1909_updated_dec_2019_x64_dvd_262ac8af.iso /mnt/win10
cp -r /mnt/win10/* /smb/win
umount /mnt/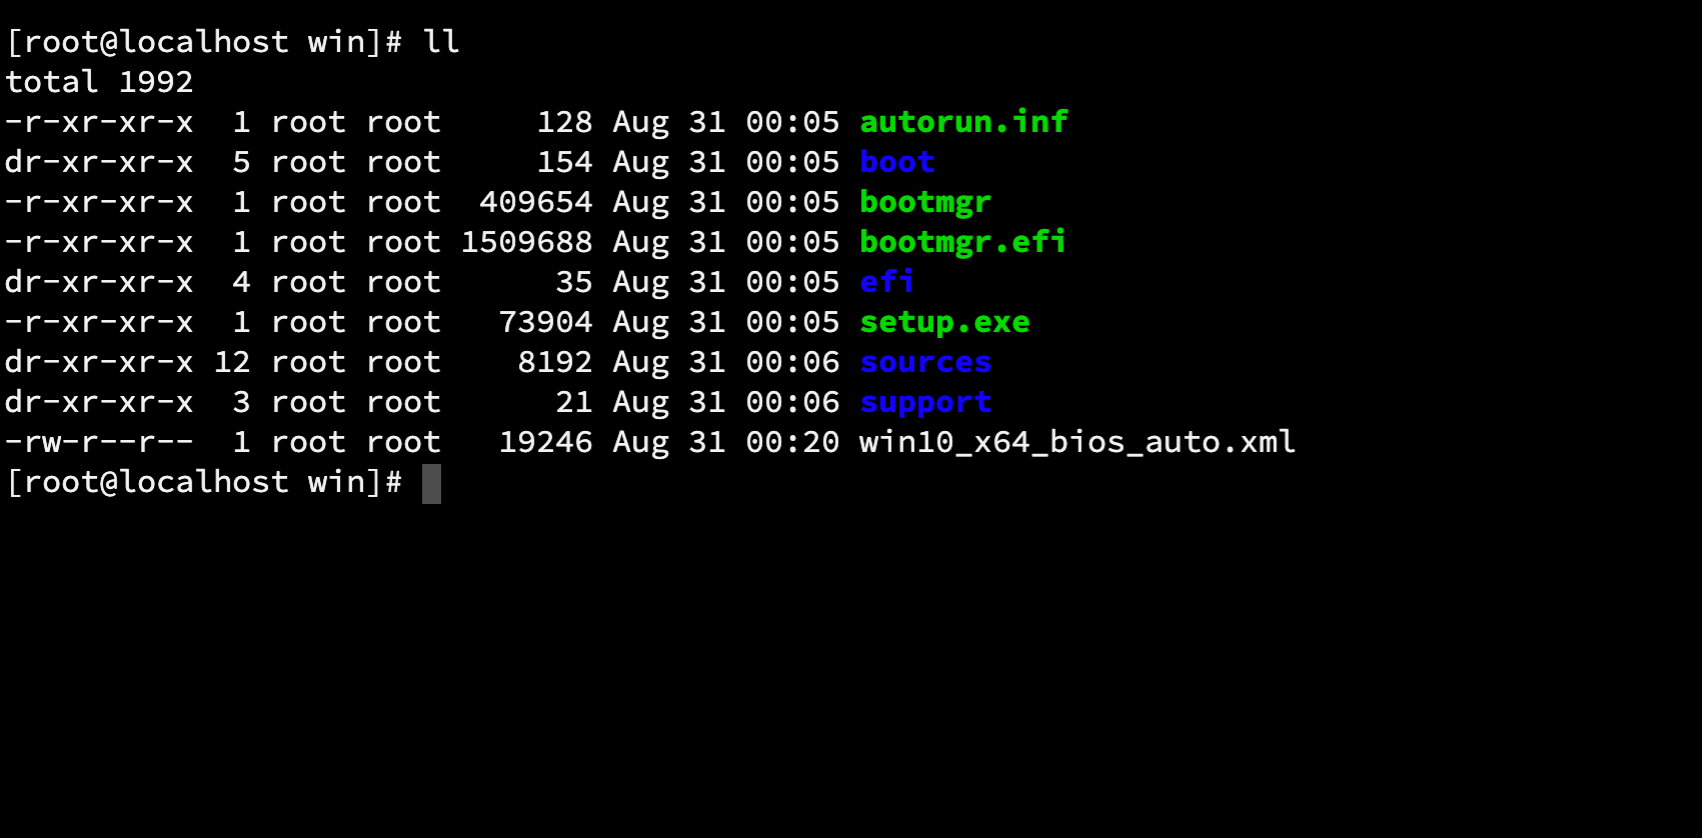
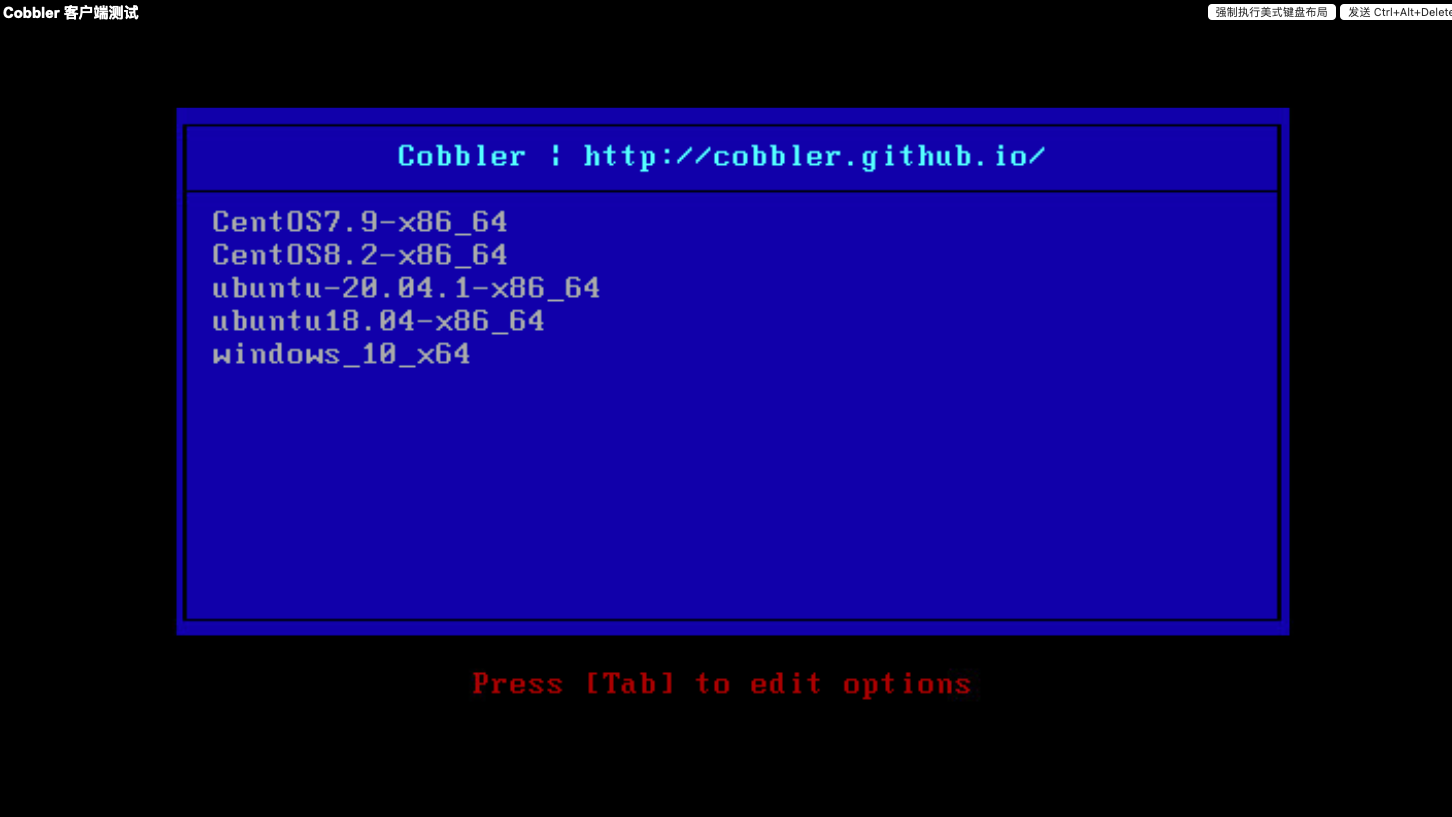
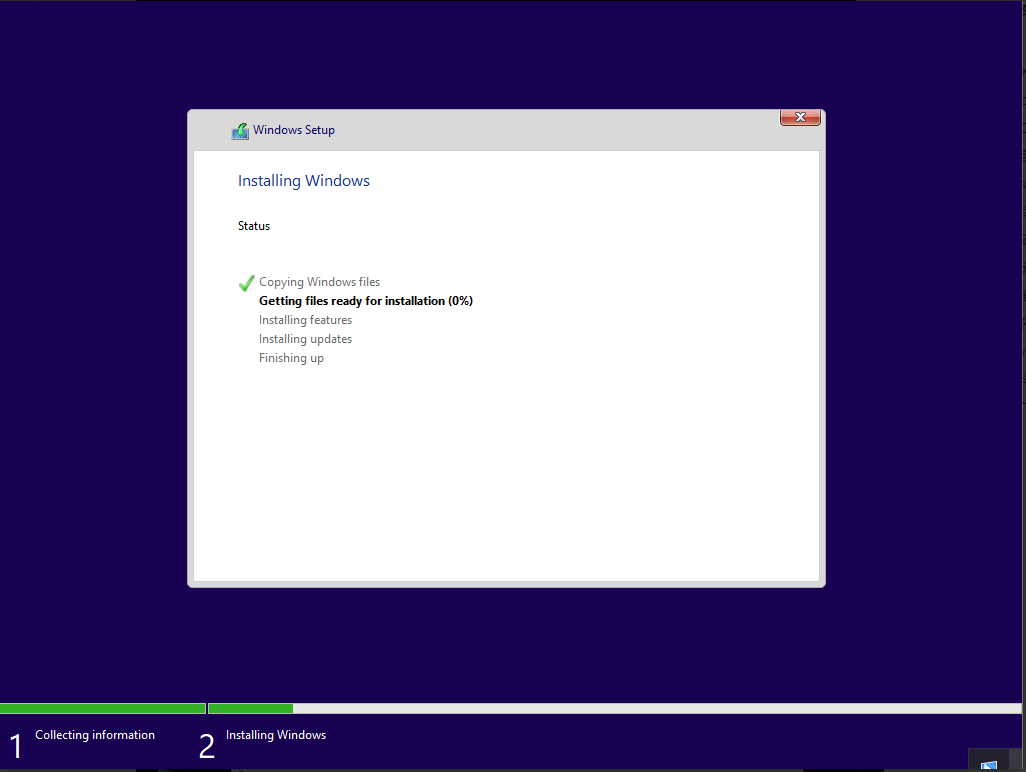
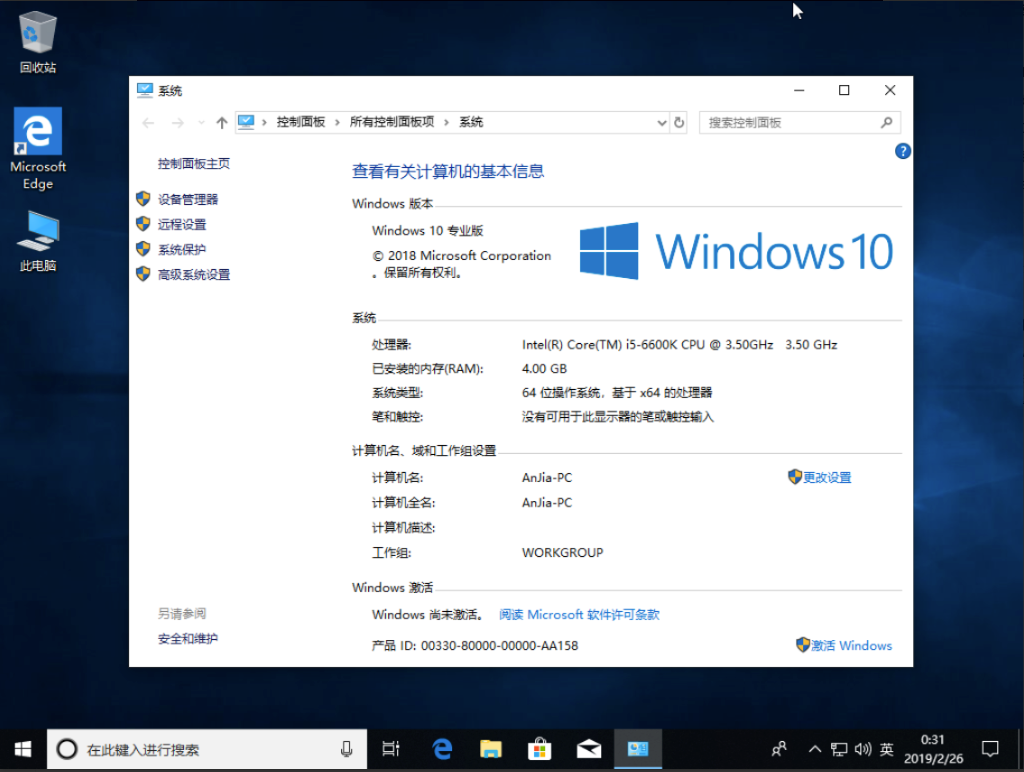
自动化安装Windows10
保证服务器跟客户端在一个网络环境。
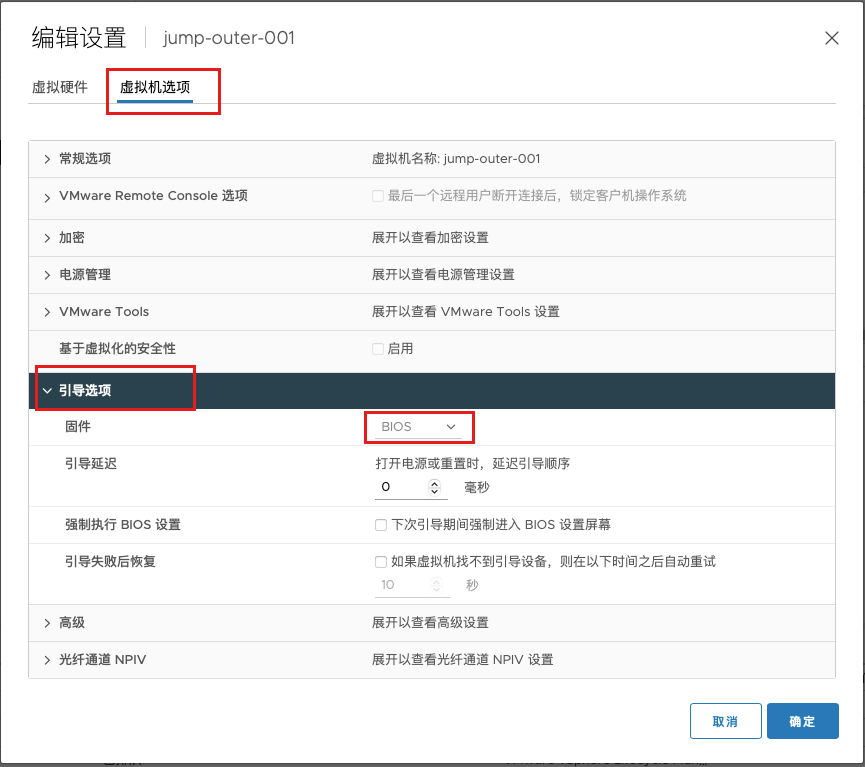
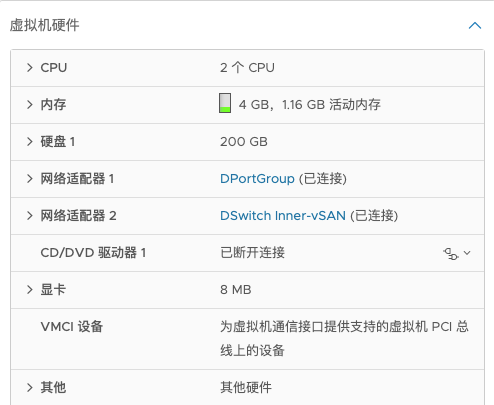
从vmware创建一台内存4G,cpu2核,磁盘100G的空盘,系统类型选择
Windows - Windows 10 X64然后开机。记得改为BIOS,默认为UEFI 无法启动。
参考资料